Python
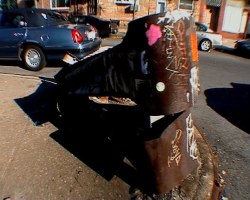
Code zur Pixelstudie Bike & Planke, 2004
2 Skripte zu verschiedenen Darstellungen von Pixelinformationen eines Videos.
Das Ergebniss kann in der Rubrik Multimedia 'Bike & Planke' eingesehen werden.
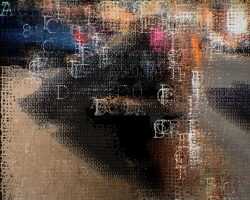
Hier das 1. Script um Pixel als #hex Werte darzustellen
Die Grösse der dargestellten #hex Buchstaben richtet sich nach der Luminanz:

 #!/usr/bin/python2.3
# this code is written in 2004 by sesselastronaut@gmail.com & is very basic
# but it's working...
# check the output on http://hasa-labs.org/orbit_en/pixelstudy.php
# it processes a series of singleframes starting with the regular image
# fading into the display of the #hex values of the displayed pixels at the
# middle of the series back into the regular image - though i've tried to
# comment it a bit i might be the only person who understands what's going on,
# so please do not hesitate to contact me if you've troubles or questions.
#import
import os, sys
import Image
import ImageDraw
import ImageFont
#get files from this folder
filepath = "/path_to_single_frames_numbered/"
#save files here
savepath = "/path_where_to_save_the_processed_frames/"
#number of startframe
start = 10
#number of endframe
end = 696
suffix = ".jpg"
#middle of the 'movie' - starting to fade back from displaying hex-values to the regular image
semiseq = ((end - start)/2)
print "there are", 2*semiseq, "frames to decode"
def hexdraw():
for i in range(start, end):
# %s - string, %08i - integer mit 8 führenden nullen, %s - string
filename = "%s%06i%s" % (filepath, i, suffix)
print "File: %s"% file, "Frame=", i
##image openeer
img = Image.open (filename)
print 'image=', img.format, img.size, img.mode
canvas1 = Image.new ( "RGBA", img.size , (0,0,0,0))
print 'canvas=', canvas1.format, canvas1.size, canvas1.mode
xmax = int(img.size[0])
ymax = int(img.size[1])
print xmax, ymax
x = 0
y = 0
#loop n draw
while x < (xmax): #width/x pixel
while y < ymax:
#print 'ypiksel=', y, 'xpixel =', x
res = 10
rgb = img.getpixel ((x, y))
lum = int(0.299*rgb[0] + 0.587*rgb[1] + 0.114*rgb[2])+72
hex = "#%02X%02X%02X" % rgb
#path to fonts you would like to be used
#i used /usr/share/fonts/truetype/freefont/FreeMono.ttf
font1 = ImageFont.truetype('/Path_to_the_font/font.ttf', lum)
font2 = ImageFont.truetype('/Path_to_the_font/font.ttf', lum/2)
font3 = ImageFont.truetype('/Path_to_the_font/font.ttf', lum/3)
font4 = ImageFont.truetype('/Path_to_the_font/font.ttf', lum/4)
draw = ImageDraw.Draw (canvas1)
draw.text ((x-1, y-12) , hex[1:], font=font4, fill=rgb)
y = y+res
y = 0
x = x+res
im = img.convert("RGBA")
mix = float(1)/semiseq
middle = start + semiseq
if i < middle:
f = i-start
mixed_canv = Image.blend (im, canvas1, f*mix)
else:
f = end-i
mixed_canv = Image.blend (im,canvas1, f*mix)
#f = i-(2*semiseq-start)
print "there are ",end-i,"frames left"
#mixed_canv = Image.blend (im, canvas1, 0.1)
#mixed_canv.show()
mixed_canv.save(("%s%06i%s" % (savepath, i , suffix)),"JPEG")
hexdraw()
Download als Python Skript: singleframes2hexframes.py
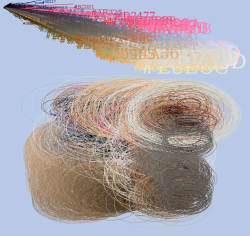
& hier das 2. Skript das
1. die #hex-Farben der Pixel in einem Koordinatensystem verortet - der RGB Wert entspricht den xyz Koordinaten
2. Pixel als farbige Kreise dargestellt - Radius richtet sich nach Luminanz -
Deformation nach der Luminanzdifferenz zu den Nachbarpixeln.
 #!/usr/bin/python2.3
# this code is written in 2004 by sesselastronaut@gmail.com & is very basic
# but it's working...
# check the output on http://hasa-labs.org/orbit_en/pixelstudy.php
# it processes a series of singleframes:
# 1. it draws the #hex-values of the pixels relocated in a coordinate system -
# rgb value = xyz
# 2. it draws pixels represented as colored arcs - radius due to luminanz &
# deformation due to differenz of neighbourpixels. though i've tried to
# comment it a bit i might be the only person who understands what's going on,
# so please do not hesitate to contact me if you've troubles or questions.
#import
import os, sys, math
import Image
import ImageDraw
import ImageFont
#get files from this folder
filepath = "/path_to_single_frames_numbered/"
#save files displayed in coordinate system here
savepath = "/path_where_to_save_the_processed_rgb_frames/"
#save files displayed as arcs here
savepath = "/path_where_to_save_the_processed_arc_frames/"
#number of startframe
start = 10
#number of endframe
end = 696
suffix = ".jpg"
#middle of the 'movie' - starting to fade back from displaying hex-values to the regular image
semiseq = ((end - start)/2)
print "das ding brauch", semiseq, "*2 frames"
#converts a point(x,y,z) in 3-dim for 2-dim display(x,y)
def z_2dim(x,y,z):
degrees = -30
angle = degrees * 2 * math.pi /360.0
x = x+math.cos(angle)*z
y = y+math.sin(angle)*z
return x,y
def hexdraw():
for i in range(start, end):
# %s - string, %08i - integer mit 8 führenden nullen, %s - string
filename = "%s%06i%s" % (filepath, i, suffix)
print "File: %s"% file, "Frame=", i
##image openeer
img = Image.open (filename)
print 'image=', img.format, img.size, img.mode
#arc canvas
arc_canvas = Image.new ( "RGB", (800,240) , (185,200,230) )
#rgb canvas
rgb_canvas = Image.new ( "RGB", (800,720) , (185,200,230) )
print 'canvas=', arc_canvas.format, arc_canvas.size, arc_canvas.mode
xmax = int(img.size[0])
ymax = int(img.size[1])
print xmax, ymax
x = 0
y = 0
#offset
osx = 730
osy = 150
lum2 = 0
v = -250
#loop n draw
while x < (xmax): #width/x pixel
while y < ymax:
#print 'ypiksel=', y, 'xpixel =', x
res = 15
rgb = img.getpixel ((x, y))
lum = int(0.299*rgb[0] + 0.587*rgb[1] + 0.114*rgb[2])
hex = "#%02X%02X%02X" % rgb
#path to fonts you would like to be used
#i used /usr/share/fonts/truetype/freefont/FreeMono.ttf
font = ImageFont.truetype('/Path_to_the_font/font.ttf', lum/4)
draw2 = ImageDraw.Draw (arc_canvas)
draw = ImageDraw.Draw (rgb_canvas)
draw = ImageDraw.Draw (arc_canvas)
xy = z_2dim(rgb[0],rgb[1],rgb[2])
#print "xyz2xy=", xy
#luminance diffrence between this and pixel before
lum_diff = lum-lum2
draw2.text ((xy[0]+10,xy[1]+10), hex[:6], font=font, fill=rgb)
draw2.line (((10,10),(xy[0]+10,xy[1]+10)), fill=rgb)
x1=(osx+x-((xy[0]+lum-lum_diff)/2))/2
y1=(osy+y-((xy[1]+lum)/2))/2
x2=(osx+x+((xy[0]+lum-lum_diff)/2))/2
y2=(osy+y+((xy[1]+lum)/2))/2
draw.arc((x1,y1,x2,y2), 0, 360, fill=rgb)
lum2 = lum
y = y+res
y = 0
x = x+res
#im = img.convert("RGBA")
arc_canvas.save(("%s%06i%s" % (savepath, i , suffix)),"JPEG")
rgb_canvas.save(("%s%06i%s" % (savepath2, i , suffix)),"JPEG")
#canvas1.show ()
hexdraw()
Download als Python Skript: singleframes2arc_rgb_frames.py
Hier die Schritte zur Vorbereitung & Verarbeitung der Einzelframes der Videos:
Video Stream de/encoding is done with mplayer/mencoder:http://www.mplayerhq.hu
1. export movie to single jpegs:
mplayer -vop scale=720:576,eq=-20,hue=0.0:-2.1 -nosound -vo jpeg -jpeg optimize=6:quality=6 nameofmovie.mov
2. cut out some frames(processing 25fps take2much time in my machine):
rm -f *~[02468].jpg ->13fps
3. rename frames in a row with the help of this little bash script:
#! /bin/bash
n=1 ## initialize first file number
z=0000 ## a string for padding with zeroes
for file in *.jpg ## for each file ending with .jpg
do
f=$z$n ## put the zeroes ahead of the number
newfile=${f: -6}.jpg ## use the last 4 characters of $f
mv "$file" "$newfile" ## move 'em out
n=$(( $n + 1 )) ## add one to $n
done
3. execute the python scripts from above
4. recode single .jpg in a folder to stream: mencoder "mf://*.jpg" -mf fps=25 -o output.avi -ovc lavc -lavcopts vcodec=mpeg4
5. eat icecream


